Are You Prepared to See The Light?
To see, or not to see? That is the question. Whether ’tis nobler in the mind to suffer the stubbed toes and fumbling fingers of outrageous fortune, or to store a light, and by opposing, end them?Â
Whether or not you’re a fan of butchered Hamlet parodies you’d probably agree that having a light to see by is critical in an emergency situation. Today we’ll go over the nitty-gritty of something we all take for granted – light & communication!

Light the Way
Have you ever walked a familiar place at night? The living room you cross ten times a day, or that fateful trip to the bathroom that you really wish wasn’t happening at 3am. In my experience, it’s one hundred times more difficult than it should be. Just this morning I took my dog into the yard and managed to knock over a suitcase and step on the poor animal’s toes. Things that would never happen in daylight… Okay, I’m pretty clumsy in daylight too, but you know what I mean!
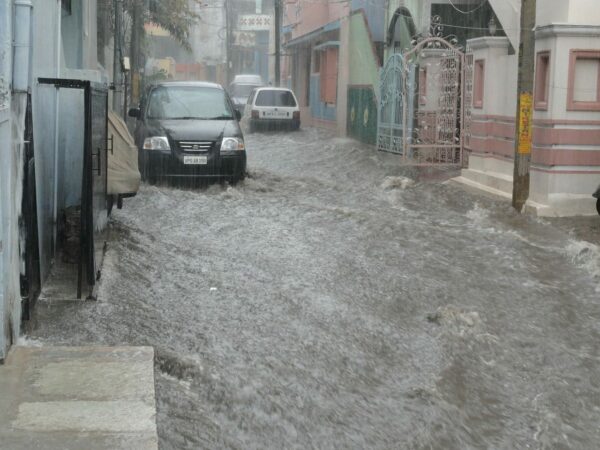
Now imagine how much more difficult it would be in an emergency. Depending on the nature of the situation you could suddenly be up to your ankles in water, choking on smoke, or surrounded by fallen furniture. All that to deal with AND the power’s out – talk about a bad night.
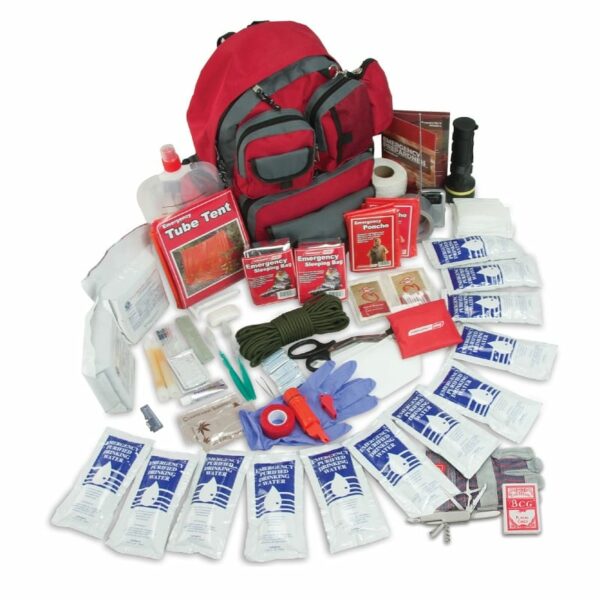
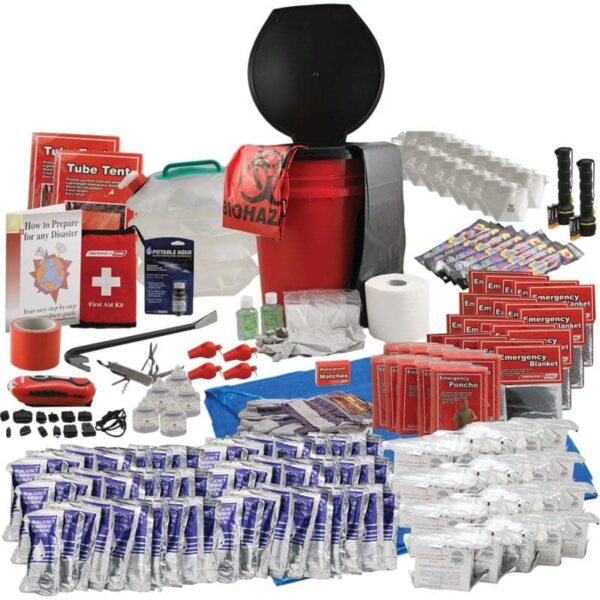
Humans rely on our sense of sight beyond any other, making light the most important thing to include in your emergency supplies after water and food. Being able to see the glass on the floor, the buttons on the radio, the instructions on the water purification tablets, or even just the toilet paper, can be a challenge to the unprepared.
Types of Light
Perfect! You have a flashlight in your kit, so you’re all done, right? Well… it’s better than nothing, but to optimize your kit there are a few types of light you should consider including. The more ways you have to see, the better off you’ll be.
Directional light is the most common type you’ll see in most emergency kits. This includes flashlights, pen lights, and the light setting on your cell phone. They are handheld, easy to direct where you need them, and perfect for following a trail or finding the bathroom.

Ambient light is an often overlooked part of any great kit. Lanterns, string lights (i.e. fairy lights), and candles are great sources of ambient light. These light a space, rather than a single beam, allowing for convenient use by multiple people at once. Ambient light is also more gentle than most directional lights, so it’s easier not to blind your family members when you’re trying to see their faces.
Hands free light includes most ambient lights, but also covers things like head lamps and clamping, standing, or magnetic work lights. These are perfect for lighting a work space like a kitchen or first aid station. Headlamps in particular are the best lighting tool for bugging out as they allow you to have both hands free to wrangle the kids, pets, and baggage while keeping the light where you need it most. Most modern headlamps will also have a red light mode which helps prevent blinding those in the beam.
Best Places for Light
Obviously, you’ll want some forms of light packed in each of your emergency kits, or even clipped to the outside for easy access, but there are certain places emergency services recommend keeping lights in addition to your kit.

The #1 suggestion we’ve heard is to store a flashlight (or headlamp) inside a spare pair of shoes, underneath your bed. Use a side table if the bed’s not an option. If you need glasses to see, a spare pair of those secure with your shoes won’t go amiss. Many disasters will break windows, and these simple precautions can drastically reduce the amount of injuries caused by broken glass.
After your kit and under your bed the next best place to keep a light is… “The Spot.” Where is the spot? It’s different for everyone. In my house, its the second shelf of the microwave cart. The Spot is somewhere easy to access and well known by everyone in the household. Most importantly, the spot doesn’t change. There is ALWAYS a flashlight (or similar) in The Spot. No matter what, everyone knows where they can find it if there’s a power failure or emergency, and they can find it with their eyes closed. No fumbling, no pushing through nick-knacks, no pulling every drawer out of the desk, just clean, instant access.
Communication
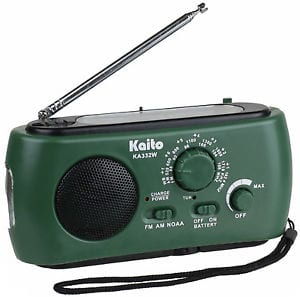
Through the miracle of technology many flashlights now come with built in radios. Radios are an important component of any emergency kit. They keep you in touch with emergency services, response efforts, and the outside world in general. Look for units that access AM and FM wavelengths, but also have NOAA frequencies. NOAA stands for National Oceanic and Atmospheric Administration.
Although NOAA is an American system, 90% of Canadians live within range of one of their towers and will be able to access life-saving reports if they have the right tools. Radios that tap into short and long range signals are also available, for those that wish to stay in tune with HAM radio operators.

How Can a Radio Save Your Life
During a disaster local radio stations will work closely with first responders to bring updates to the public. They can warn about the direction a forest fire is heading, whether a tsunami is expected, or what roads are impassable.
Radio broadcasters can also give instructions on behalf of rescuers, informing the public of what they can do, where they should go, or how they can help. Always listen to your radio when you can – you never know when that life-altering piece of information might be broadcast.
Weather Band VS Weather Alert
For those who rely on regular, reliable weather forecasting for their day-to-day activities (mariners for example) weather band radio will be nothing new. Weather band radio is a continuous, 24/7 nationwide radio station that reports on the weather for several areas.
These stations are updated every few hours by live, human professionals (not robots) stationed strategically in lighthouses or way stations throughout Canada. Although these channels aren’t exactly ‘easy listening’ they are one of the most accurate weather tools in a layman’s arsenal. Be sure to learn more about weather band radio here.
For those of us that aren’t fans of listening to static-laden, tinny voices for hours on end, there’s also weather alert radio. When activated, weather alert radios will sit quietly until there is an emergency signal received. When this happens, it springs to action and reports, in some cases even flashing yellow, orange, or red (depending on the severity).
If you want to get really snazzy, there’s even something called S.A.M.E technology included in radios like the FRX5. S.A.M.E allows you to program in which locations you want to hear about. This way you don’t have to be interrupted by a warning for a city that’s too distant to effect you. Programming this in is easier than it sounds too – just make sure to have the instructions handy!
Where’s the HAM?
Requests for HAM radios are not uncommon in our industry. They are amazing tools that allow operators to communicate with other HAM users across the globe, and even on the international space station. They are primarily used to assist emergency personnel with communications during a disaster, but during peaceful times hobbyists converse globally on all sorts of topics.
The only downside, if you see it that way, is that HAM radios require a license to operate. They are simple to use, however there are protocols that must be learned to use them effectively. If you’re interested in learning more, check out the Radio Amateurs of Canada, a community for like minded individuals.
Out of Batteries
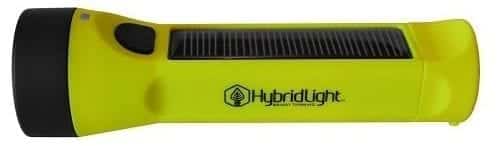
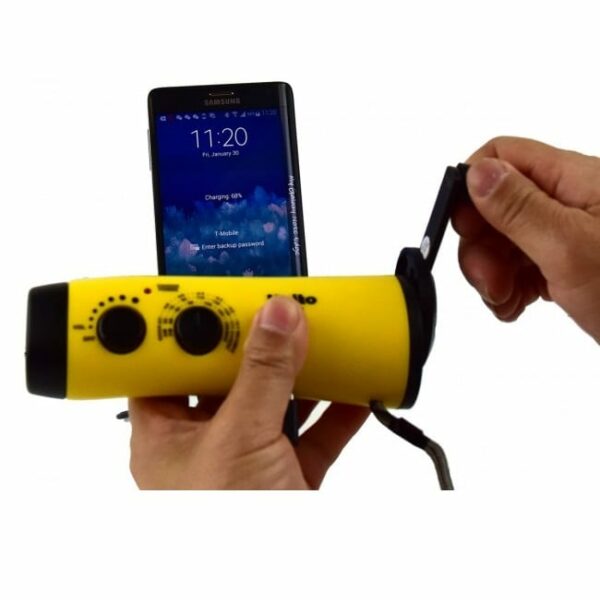
When choosing your source of emergency light be sure to think about how it will be powered. Candles burn out, batteries run low or leak, and if you’re wounded crank might be difficult and tedious. We recommend looking for options that use multiple charging sources. There are some that can be pre-charged through USB, take alkaline batteries, have a solar panel, AND can be cranked – just in case you REALLY want your bases covered.
Otherwise, be sure to keep your battery drawer well-stocked, or a lot of extra candles around. We’ll talk about solar generators in another post, but if you’re interested in being able to charge or run most electronics during a power cut, check out the Yeti series.
Charging Your Lifeline
Did I say lifeline? Sorry, I meant cell phone. Though in an emergency they can be one and the same. Keep a couple of cheap external batteries charged in your kit and/or a light/radio that can charge a phone. Like all electronics, don’t forget to top up the charge when you update your kit (every 6 months – a year). This keeps the batteries from dying prematurely. We’ve all had the experience of finding a flashlight that just won’t hold a charge, no matter how hard we crank!
Will Cell Phones Work After a Major Disaster?
Great question! I’ll be honest, I don’t know the answer. I’ve searched and spoken to experts but the responses vary from ‘90% of cell towers will still be operational,’ to ‘the earliest we’ll have communications is 72 hours after the event.’ Even with these answers though, I am sure of four things:
- Better safe than sorry. You’re going to have your phone on you anyway, may as well make sure you’ll be able to use it if you can.
- The longest we are likely to be out of service is 72 hours in urban areas. Portable cell towers will likely be getting organized around this point.
- Many emergencies will leave cell towers unmolested, keeping signal alive and well.
- These days smart phones have an incredible amount of utility above and beyond communications. It won’t hurt to have a calculator, notepad, entertainment system, photo album, camera, or flashlight around. Especially if they’re all in one unit!
Best Practices for Cell Use in an Emergency
If your network is still operational in an emergency there are a few things you can do to give yourself an edge. It is likely that there will be a lot of competition for the airwaves as people try to find their loved ones. The best way to get your message through the digital clutter is to text, not call. Texting takes up only a fraction of the space that a phone call does, so they can slip past busy points more easily than a phone call.
The second thing you can do is to limit yourself to calling only your emergency contact and emergency services (if you are hurt or on fire).
‘Who You Gonna Call?’
I know your gut reaction will be to call the school, or the parents, or your partner. That’s very natural, and by all means try them first. But when you get those beeps telling you that the line is busy, call your emergency contact. Who’s that? Someone out of town, or even out of province, who you trust. As part of your preparedness plan make sure this person knows that they are your contact and that they have a list of all your important numbers. Keep them up to date as numbers change!
Ensure that everyone in your family has the contact’s number memorized and knows to reach out to them as soon as possible. That person is going to be your communication hub so you can focus on hiking to the day care.
Summary
If you only take away one thing from this article, let it be the importance of having a radio/flashlight option and the means to charge it. If you’re willing to take two things away, add on the value of preparing an emergency contact. Three things? Your electronics require maintenance whenever you’re checking on your emergency supplies.
If you’re taking away four things you may as well read the whole piece! Happy preparing and thank you for reading!
This article was written by Zenia Platten – Writer and emergency preparedness professional. Want to read more of Zenia’s work? Check out her new book, Tethered, available June 1, 2019 on Amazon, Kobo, Nook, and Apple Books.Â
Keeping Warm When an Emergency Leaves You in the Cold
Why Warmth Matters
Total Prepare’s retail store is located in Victoria BC, and it’s not unusual to hear “It doesn’t get that cold here, I’m not worried about that part,” when we approach warmth as something to include in a kit. But disasters aren’t limited to the warmer months, or even the in-between times. In fact, Murphy’s Law predicts that if there is a major emergency it will almost definitely happen on Christmas, while there’s snow on the ground. It’s probably raining.
Health
In extreme situations, cold makes us vulnerable to injuries like frostnip, frostbite, hypothermia, and trenchfoot. Severe versions of these can lead to amnesia, dizziness, nausea, limb loss, and even death. They are no joking matter! One doesn’t even need to be lost in the wilderness for these to occur. My brother still has signs of frostnip from an hour-long, gloveless, winter scooter ride he made years ago.
Frostnip and frostbite both occur when body tissue freezes and eventually dies. While frostnip is generally just an uncomfortable freezing of the skin, it can escalate quickly into frostbite and should be treated immediately. Frostbite happens when the cold gets deep, freezing fat, muscle, and bone. Keep a close eye out for blue or black skin on your nose, hands, and feet, especially in the nail beds.
Hypothermia happens in three stages, and is brought on by your core temperature dropping. The first stage is easy to miss, showing itself as simple shivering and reduced circulation. It usually does no long term damage, but can lead quickly to stage 2 and 3. Symptoms of Stage 2 include confusion, a weak pulse, trouble breathing, irritability, a lack of coordination, and ‘sleepy behaviour.’ Stage 3 is where things get scary. There might be little to no breathing or pulse from the subject, and they will likely lose consciousness. In stage 3, it’s not unusual to feel warm as the body tries to compensate.
Perhaps the most dangerous aspect of Hypothermia is that it affects the ability to think. The slowing of blood flow makes thoughts sluggish. It can be difficult to recognize how bad things have gotten, or to react appropriately. Blood pressure and risk of heart attack also rise in the cold due to the same slow blood flow.
Trenchfoot is a cold injury that occurs between 0 and 10 degrees Celsius, when the subject’s feet are wet for long periods of time. The feet lose heat 25x faster when wet, accelerating this condition. As the body cools, it constricts blood vessels to hold as much heat as possible, shutting down circulation to the feet. A lack of blood flow creates toxin build up and denies tissue valuable nutrients and oxygen. The tissue begins to die. Symptoms of trench foot include reddening of the skin, numbness, leg cramps, swelling, tingling pain, blisters or ulcers, bleeding under the skin, and even gangrene.
Comfort and Psychology
Have you ever heard “cold and ecstatic” used to describe the weather? Probably not. Cold and miserable just go too well together. Winter weather, with its gnawing cold and insistent rain and snow can have a powerful effect on our psyches and will. Just try getting out of bed on a cold day – bye bye motivation!
Seasonal Affective Disorder (SAD) is a type of depression that is influenced by long periods of certain weather. Usually rain, thick clouds, or snow. It is believed that the disorder is brought on by a lack of exposure to sunlight, and light therapy is the main treatment. During an extended emergency or recovery period, stress is greatly increased and the risk for depression rises. If your emergency happens when the sun’s not shining, risks rise further.
Ways to Stay Warm Without Power
Blankets
Whether it’s a cozy wool blanket knitted by your Nana, or a mylar option from your emergency kit, the humble blanket is an excellent tool for keeping warm. Keep a few different blankets with your kit including waterproof/resistant ones, and thick, comforting options. Almost all commercial kits will include a version of mylar blankets. These are made from lightweight, durable, water/wind proof materials that reflect your body heat back to you.
If it is very cold, layer your blankets with the reflective option outside your cozy one. The mylar will push back any heat that would be lost and you’ll be snug in no time!
Hot Food & Drink
Hot chocolate anyone? If you find yourself shivering in an emergency, try to avoid eating your food cold. Wherever possible warm up your meals and drinks so your body doesn’t have to work overtime to keep your temperature from dipping. With the power out, the ice cream in the freezer will melt. Let it.
If a fire or camp stove isn’t an option for you to warm your meal, try a chemical solution. Flameless meal heaters activate with just a splash of water and do an admirable job of heating a can of soup or tupperware of leftovers. (Great for picnics too!) I recommend using this option in a ventilated environment though, as the smell the heater produces… well let’s just say it doesn’t smell like home cooking.
Avoid the Spice
They’re called hot peppers for a reason right? So you might think a jalapeno would be the way to go when planning your cold weather meals, but this is not the case! Although peppers make you feel warmer, even to the point of sweating and reaching for ice, it’s actually making you colder.
Spicy peppers contain a chemical called Capsaicin. This chemical tricks the nerves in your body into thinking they’re warm. The body responds appropriately, sweating to cool you down. The result is a similar effect to drinking alcohol, where you feel warmer but your core temperature lowers. This is why spicy food is so popular in hot climates.
The takeaway? Keep your beer-and-pepper siestas for the summer months.
Movement/Work
Exercise and movement make your blood flow faster. The chemical reaction that happens during exercise results in excess energy being released as heat. That’s why we sweat during a workout. If you’re too cold, keep moving – even if you only use small movements like wiggling your toes and fingers. Every bit helps!
A word of caution though, extreme cold can increase your likelihood of heart attack. If you’re exercising for warmth, keep an eye on your heart rate. If you begin to get dizzy or confused, stick to smaller movements. Try to also avoid building up sweat, as the extra moisture will wick away your heat quickly. Find the sweet spot where you’re warm, but not worn. A brisk walk often works well.
Hand/Foot/Body Warmers
Technology has an answer to everything and electric-free heat is no exception! Chemical hand, foot, and body warmers are easy to find and work beautifully to keep your boots and pockets toasty warm. Mostly composed of iron powder, these warmers activate when exposed to air, releasing heat as they oxidize. Look for re-usable liquid units at the dollar store if you’re using these regularly and want a non-disposable option.
Hot Water Bottles
This may sound strange, but I was in my twenties before I realized the sheer joy of a hot water bottle. My partner’s family gave me one on a frosty afternoon – just a used 2 liter pop bottle full of hot tap water – and my word! Did it ever work! If you’re stuck without electricity at home, but still have hot water around, this is a fast, cheap, highly effective option for keeping warm. Just make sure the caps on tight!
Snuggle

Getting cuddly isn’t for everyone, but when push comes to shove sharing body heat can be our only option. If you are in an extreme situation, strip down for maximum heat transfer, and wrap up together in your clothes and blankets. If you are in a non-survival situation, keep the clothes on (unless you REALLY like each other – your call), and snuggle up!
Head to Toe
Heat escapes our bodies quickest through our head, then our feet, then everywhere else. If you’re body feels cold, but you’re head isn’t, that’s because it’s acting as a little radiator. If you have the option, insulate your head and feet whenever you’re heading into a frosty situation.
Alternate Shelters
Staying warm is often dependent on staying dry. Our bodies lose their heat 25x faster in water. We’ve written about how to build a shelter here. Naturally, stay in a house or insulated building if at all possible. I know Bear Grylls makes survival look good (really good!) but facing the naked elements is a whole lot more comfortable on TV.
Shelter Building Tips
Keep off the Ground – Even if it’s only a layer of dead leaves, keep something between you and the earth. Make a mat of sticks, use an emergency blanket, or pile up natural detritus to keep yourself from direct contact with the cold ground.
Make or Find a Wind Break –Â Â If you’ve ever worn a wool sweater, you know what a difference a little wind can make to even the coziest insulators. Find or build something to block the wind, or look for natural alcoves to stay in.
The father of one of the owner’s here at Total Prepare once found himself lost in the woods overnight on Vancouver Island. He survived with only a light case of hypothermia thanks to his nighttime refuge inside a rotten log. Get creative with your shelters if you need to!
Best Natural Insulators
The goal of insulation is to trap heat between your body and the elements. Plugging drafts, stuffing your clothing, and layering up are all great ways to insulate. Finding material to use for this task is more simple than you might think.
If you’re a hunter-survivalist extraordinaire you can probably tan enough rabbit skins for a quick fur coat, but the rest of us need to settle with what we can find. Plant fiber makes excellent insulation so gathered leaves (alive or dead, but dead is better), bark, pine needles (ouch!), and grasses can all be used to fill in clothing and insulate you from the ground. If you’re coastal, you can even use seaweed to block any holes in your shelter. If you take this route, don’t get wet!
Snow makes a surprisingly good insulator too, despite its frozen nature. Use it to reinforce shelter walls and block any breezes. For obvious reasons, don’t use it for clothes stuffing -brr!
Urban Insulation
Canada is referred to as the Great White North for a reason – it can get pretty flipping cold here. Our frosty climate coupled with a storm, solar flare, or other unforeseen event can make keeping warm a task even if you’re in your home – especially if the power is out.
If this happens, create a warm room from a closet or other small room. It’s much easier to heat a smaller space. Pile in blankets, sheets, couch cushions, pillows, and anything else that might insulate you and keep your body heat close.
If you have other bodies around – human or pets – get cozy in this makeshift nest to share heat. Dressing in layers also helps.
Caught outdoors in the icy weather, but still on the city streets? There are often insulators around there too. If no other shelter can be found look for cardboard, plastics, and foam to pile up near a windbreak. If supplies don’t lend themselves to building a whole shelter, bury yourself in them. Every piece helps.
Thank you for reading.
This article was written by Zenia Platten -Writer and emergency Preparedness Professional
3 Steps to Prepare Your Business
We aim for this guide to be comprehensive, but please don’t hesitate to contact our team of professionals for personalized help. We’re always more than happy to assist!

Making a Plan
Risk Assessment
Hazards
Effected Assets

Impacts and Mitigation

Creating a Plan

“Don’t worry Alex, we’ll sort this out. Have you seen Jenson?” you ask, offering what comfort you can. Alex sobs, lifting a shaking hand to point at the basement door.
“He was double checking the pipes when it all rushed in. I didn’t see him come out. I called 911 but the number’s busy. No one’s coming.”

Supplies

DIY Workplace Emergency Kits

Blue Can Water
Food


The Essentials
- Emergency Blankets
- Emergency Ponchos (body heat is lost 7x faster when wet)
- First Aid Kit
- N95 Dust Masks
- Waste Management Kit (and lots of extra hand sanitizer)
- Flashlight/Radio
- Binder listing staff and emergency contacts
- Tarps
- Rope
- Lightsticks
- Candles/Matches
- Garbage bags
- Army Knife
- Generators/Solar Panels
- Emergency phone chargers
- Duct Tape
- Carabiners
- And lots more!
- Hard Hats
- Pry Bars
- Sledge Hammer
- Extra Blankets
- Extra First Aid
- Safety glasses
- Work Gloves
- Reflective Vests
- Signal Whistle
- Shovel
Practice Makes Perfect

Summary
TEDx Talks Preparedness
You’re visiting Total Prepare, so there’s a pretty good chance that you are already prepared, or are thinking about preparedness seriously. But do you ever look around at your family and friends and wonder why no one else seems to be ready? Steven Eberlein did, and lucky for us he’s written and performed a TEDx talk on the subject!

Having spent a year working with relief efforts in Sri Lanka after the third largest subduction zone earthquake in history claimed 250,000 lives, Steven came home to Oregon. Returning to a state that sits on an active and tense subduction fault line didn’t frighten Steven. What worried him was a general lack of preparedness in all the people sharing the straining fault (that’s us too BC!)
Steven points out that most people know we should get/be prepared, but no one really expects anyone else to take those first steps. We see examples of this in our store all the time; people will stockpile extra food and water because they know the neighbours, tenants, or land-people are not prepared, and won’t be any time soon.
In this Tedx talk, Steven deconstructs the ‘why’ of the phenomenon he calls the common sense gap, and how to close it. He delves into the cultural stigmas that keep us in place, and explains the permission structures we need established to fix the problem. Imagine, a future of readiness where everyone not only knows what to do in an emergency, but are also prepared to do it.
In Canada, we often share Oregon’s love of camping. We’ll happily go into the great outdoors and voluntarily survive (and even thrive!) without our usual services. We’re just not ready for camping to come to us.
This resistance must be overcome any time there is a cultural shift. Trend-setters, mavericks, and those who draw outside the lines are experts at setting new permission structures and changing the world around them a little at a time. We can be those mavericks.
Start by setting up a small kit, or getting one component together (food and water for example). Then tell your circle about it. Teach your family your emergency plan, then share what you’ve done with others. Keep chipping away at preparedness and including others on your journey. This will normalize preparedness a little at a time, and soon they’ll be doing it too. If we keep it up, an expectation will be built and having a kit and a plan will become the normal, natural thing.
We hope you enjoy Steven’s video as much as we did, and we’d love to hear what you thought of it in the comments and on social media!
Thank you for reading.
Written by Zenia Platten – Writer and emergency preparedness professional.
Bear Safety
Canada is renowned worldwide for many things: maple syrup, endless forests, crystal clear lakes, towering mountains, hockey, and poutine. But one thing stands above the rest in making Canada a stand-out nation and popular tourist spot, despite our weather. I am, of course, talking about our diverse and populous wildlife.
For most of day to day life, an average person is only likely to run into the cuter side of our country’s fauna. A rabbit in the garden for example, or a raccoon crossing the driveway. On a good day we might spot a deer wondering through the suburbs. But what about those instances when something a little bigger wonders into town? Or crosses our paths on a camping or backpacking trip?
In this post, we’ll be discussing how to avoid a bear encounter and what to do if you are confronted by one of these magnificent animals.

Before camping or hiking
As with so many emergencies, preparedness will give you a big advantage when encountering any predator. If you know you’re heading into bear country, pack smart! Be sure to bring bear spray and know how to use it. Someone worked hard to write all those instructions and safety warnings, and it wasn’t just to meet industry requirements! Bear spray follows the same rules as spitting: don’t spray upwind.
Before you head into bear country, be sure to check the campground/trail webpages, and keep an eye out for signs warning of bears in the area. As you walk watch for bear droppings, paw prints, or leftovers. If you spot anything, or think there might be a bear in the area, there are things you can do to mitigate your risk.
Deterrents
Unless a bear is unhealthy or too used to humans, they will want to avoid you. You can help them do this by making lots of noise as you hike. Singing, clapping, whistling, or carrying a bear bell are great ways to give the local wildlife plenty of time to move out of your path. Stay together and keep pets on leash to avoid surprising any bears that might hear the main group, but not a solo wanderer. And sorry Fido, but Yogi doesn’t want to play.
If you’re camping in the back country and don’t have an official bear vault handy, don’t forget to check your provincial guidelines on how to best store your gear and set up your campsite to avoid an unexpected or curious dinner guest. In BC, hanging one’s gear from trees, keeping a clean campsite, and keeping the cooking area far from the tents are top tips for keeping a bear-aware campsite.
Time to Fight a Bear.
Okay, maybe not, but I couldn’t resist that headline.

Sometimes, no matter how much you prepare or plan or educate yourself, things just happen. A bear might wander into your suburb, or your brother-in-law might leave a full stick of pepperoni in the tent (true story), or you might sing your heart out only to encounter the one deaf bear for miles. So what do you do if you come face to face with one of Canada’s biggest predators?
- Don’t run. Running makes you look like prey.
- Speak in a low, calm voice – whether or not you think the bear has seen you yet. You don’t want to surprise it.
- Make sure you are not between it and its cubs.
- Back up slowly, not turning your back to it.
- Don’t stare. It’s bad bear etiquette and they will take it as a challenge.
Sometimes, despite all our best efforts, we can’t help but look delicious. In the rare instance when a bear might approach you, remember the most important rule of dealing with predators:Â Do Not Run. Bears are adorable, but they are also incredibly fast (35 km/h). There are two ways a bear might approach you, and it’s important to know the difference:
A Defensive Charge: this is the more common interaction people have with bears. It occurs when the animal feels threatened and wants to prove it’s scary. Black bears are notorious for “bluff charging” and you can see one in action in this video: (2:13 is a good example).
If a bear is being defensive, but closes the distance, use your bear spray. If you have none, lay on your stomach and protect your neck with your arms. Don’t ditch your pack (if backpacking) as that will provide valuable armour. The bear should lose interest quickly once it is sure you’re not a threat.
An Offensive Charge: These are the things of nightmares (nightbears?). Very rarely, a bear might see a human as food, and stalk them along the trail. If you see this behaviour, calmly make your way inside a building, car, or up a tree. Bears can climb, but it’s much harder to hunt climbing prey. If they charge, use your bear spray, and failing that, fight it with anything at hand. Sticks, rocks, hiking poles – anything can be used to fight. Best case scenario, you make yourself too much trouble and it leaves to hunt easier prey. Worst case scenario… well at least your friends and family can say they knew the hero that went down swinging.
Thank you for reading!
Article written by Zenia Platten – Writer and emergency preparedness professional.
First Aid Comes First
We cannot stress enough the importance of having a first aid kit with you or nearby wherever you go. Every business is required to keep one, every government office too. Heck, even trail heads will advise you to take one with you on your hike. We’ve all had cuts and scrapes that we were grateful to have patched with a quick dose of anti-septic and a band-aid. But what about the extremes?
First Aid for Micro-Wounds
In tenth grade I was a student in our high school’s metal shop program, run by an eccentric and much loved teacher who we’ll call Mr. Crazy. During our debut visit to the shop all the students piled in, chatting to each other and waiting for the lesson to begin. We jumped out of our skins when Mr. Crazy slammed his hammer against the table we were gathered around as hard as he could, making the room ring and shocking us all to attention.
“Listen up!” he called, making sure he held every eye. “First Aid’s first. If you get so much as a sliver, I want it dealt with properly.”
He walked us around the shop, showing us the off-white eye-wash station, the tired red first aid kit, and the squeaky clean, brand-new box of disinfectant wipes. He explained each of the symbols for poison and caustic, and where and when to wear gloves, aprons, and eye protection. With all of this done, he held up his hand, displaying missing fingertips and crooked fingers. He told us the story of each, but one in particular stuck with me.
“And this one,” he wiggled his left ring finger, top intact but stunted and wonky, “was from filing a piece of copper. I got a sliver of metal under my skin – didn’t think anything of it at the time, it was no big deal. By the time I got home it was a little red, and when I woke up the next day it was swollen, hot, and turning my veins crimson. My wife rushed me to the hospital, and if we had waited any longer, the doctor said I could have lost the whole thing.”
Mr. Crazy’s crooked fingers are the perfect reminder of how important treating even the tiniest wounds can be. A quick rub with a disinfecting wipe, or a dose of Polysporin could have saved that teacher a lot of pain. Inaction over an infection could have lead to worse, losing the digit, or even the limb.
I’m not saying we should all rush to treat every splinter or bitten tongue we come across, but know the signs of infection and be ready to take preemptive action if you’re in an unsanitary environment. If you see redness around a wound, swelling, unusual discharge (green or cloudy), or begin to get a fever, consider applying antibiotic. If symptoms persist, visit your doctor or the local hospital.
Major, Life-threatening, TV-worthy Wounds

If you’re hoping I’m about to tell you how to stitch a wound, tie a tourniquet, or conduct heart surgery, then you’re going to be disappointed. In fact, I’m going to tell you not to do any of those things. At least, not without the proper training.
We get people in our store regularly who look at our first aid kits and have the following conversation with us:
“Does this come with a suture kit?”
“No, sir. Butterfly closures are in there and do a similar job.”
“What about splints?”
“No sir.”
“What’s the point then?”
“Well, sir, do you know how to use a suture kit or set a broken bone?”
“Well… no.”
The truth is, most people don’t have medical training, and shouldn’t pretend that they do. Watching Grey’s Anatomy doesn’t qualify anyone for a medical degree (but what a world if it did!). In fact, when people try to mimic media, or use techniques they are unfamiliar with, they will often do more harm than good.
We spoke to a retired first responder and fire chief who really drilled this home for us. He told stories of well-meaning individuals administering first aid outside of their skill set, with unpleasant results. Physical consequences aside, the legal impact of conducting first aid above one’s training level can be devastating. On more than one occasion the retiree recalled watching people’s lives be torn apart by lawsuits, all because they gave unwanted help, or their good deed didn’t go as planned.
So, what can you do?
You don’t have time for med school, but you still want to help. That’s really admirable and you should be proud. Happily, there are things you can do as a lay person to help in a serious medical emergency:
- Call for help. The 911 dispatcher will be able to walk you through situation-specific instructions.
- Use the classic line “Is there a doctor in the house?” – Help might be at the next table over.
- Take a class to learn the very basics. The Heimlich maneuver, CPR, and basic wound management are great starting places.
- Comfort the victim. If they’re still conscious, they’re probably terrified. Even just speaking to them and stroking their hair can have a huge emotional impact.
- Make sure there is a clear path for first responders once they arrive at the scene.
- Once first responders arrive, get yourself and anyone else out of their way.
Summary
If you find yourself in or near a medical emergency, act with intention and forethought. Never assume someone else has already called 911 unless you can see/hear them doing it, and always follow the instructions of the professionals. Whenever possible, have first aid supplies on hand, and educate yourself on how to use them.
Thank you for reading!
This article was written by Zenia Platten – Writer and emergency preparedness professional.
Now You’re in the Snow
Howling winds drive ice and snow against the windshield, hiding the road as you dutifully follow the trail left by the car ahead. The car’s heater whirs loudly on high, blasting hot air at the glass to stop it from fogging, though white haze is still creeping in at the edges. As the trail ahead disappears, you’re left wondering if you missed your turn, and you’re forced to stop, unfolding a map to try and find where you may have gone astray.
You think you find it, a left that should have been right, and the car grumbles as you slide it back into gear. Gentle pressure on the accelerator gets you nowhere, and your heart pounds as you try the same in reverse. Nothing. You haven’t seen another set of headlights for 20 minutes. You are alone, and stranded.
What do you do?
Winter Storms are common in much of Canada, blanketing huge tracts of land in snow and giving the country its moniker of ‘great white north.’ Snow can be accompanied or precluded by driving winds, limited visibility, and ice rain. When one or more of these forces combine the results can be challenging, or even deadly, for the unprepared.
Today we’ll be discussing specifically what to do if you are stranded in a vehicle during a blizzard, but for great information and all sorts of blizzard and snow related tips, check out getprepared.gc.ca.
If you find yourself in the situation described above, do not leave your vehicle unless you can see your destination nearby. If there’s an open Starbucks and you can see the iconic green mermaid, head inside and wait out the worst of the storm. Otherwise, stay with/in your car, it’s a good wind break and much easier for a potential rescuer to see than a lone person.
To keep the air in the car fresh, open the window slightly on the sheltered side of the car, away from the wind. You can run the engine for short bursts, about 10 minutes of every 30, but make sure your exhaust pipe isn’t plugged by snow first. This is extremely important. A plugged exhaust pipe can lead to deadly carbon monoxide fumes pooling in your car. These fumes don’t have a smell and are very difficult to notice. Inhaling a lot of carbon monoxide can kill a person in minutes, with only a few symptoms to give warning. Dizziness, tension-like headaches, vertigo, and breathlessness are all things to watch out for.
If you have a phone call someone to let them know where you are (as best you can) and what the situation is. Try to refrain from using your phone too much (I know Candy Crush is tempting) to preserve the batteries for any other emergency calls you might need to make.
Keep moving to work warmth into your hands and feet. Movement also helps you to stay awake, which is imperative. Your heart rate drops during sleep, and your body will have a harder time staying warm. If you have a shovel and decide to clear a space around your car, be careful not to over exert yourself. Combined cold, exertion, and sweat can cause hypothermia and heart attacks.
Packing some basic warmth and survival supplies into your car is an excellent way to give yourself every advantage in winter survival situations. Food, water, a survival blanket (or sleeping bag), and hand warmers should be an absolute minimum, with jumper cables, ice scrapers, and work gloves also making great additions. Total Prepare also carries a professionally compiled Deluxe Vehicle Kit, which has a little bit of everything.
Summary
Packing a kit, staying with your vehicle, keeping warm and awake, and being mindful of carbon monoxide are perfect first steps to surviving a harrowing day or night trapped in snow. Wave down any passing cars that can take you somewhere safer, or wait out the storm so you can dig out your vehicle. If you have any tips or tricks for surviving a vehicle related snow-mergency, let us know in the comments!
Thank you for reading and stay toasty!
Written by Zenia Platten – Writer and emergency preparedness professional.
The Ins and Outs of Freeze Dried Foods Part 4 – MREs
In this final installment of our series we’re going to talk about food storage royalty. With its’ all-in-one nature, compact packaging, solid flavours, and impeccable calorie/protein counts this is easily the most difficult item to keep on our shelves. I am of course talking about Meals Ready to Eat.
Commonly referred to as MREs these rations were originally designed for military use and replaced canned combat rations in the US in 1981. Lightweight in comparison to their wet canned predecessors, MREs allowed supplies to be carried longer distances by soldiers on foot, and for aid to be sent quickly and efficiently to victims of natural disasters. Even in 2019 all production of MREs is redirected to disaster relief when necessary to ensure these awesome little rations go where they are needed most.
So what makes MREs the most searched for food storage rations? Convenience, with a capital C. MREs come complete in one durable pouch and include everything you need to enjoy the meal. Cutlery, salt, pepper, napkins, and even hot sauce come packed alongside the main meal and 2 sides, and if you have water handy a juice mix and instant coffee packet are also included. Each item is individually wrapped, allowing those with smaller appetites to save pieces for later, or for easy trading.
The final puzzle piece that makes MREs so popular is the included flameless meal heater. These pouches contain chemical, single-use, heating packs that activate with just a splash of water and warm your main course from room temperature to piping hot in minutes. These packs can be used indoors, don’t require refueling, and can be activated with any kind of water (even snow) as the liquid never touches the food. Once your meal is ready to eat, you can keep the heater as a hand warmer until it cools off (it lasts at least an hour).
Each MRE meal contains 1200+ calories, with an average of 1300, making it easy to get your daily minimum calorie allowance from just one ration. With two rations per day most people will be comfortable and not feel hungry (2400 calories). Our MREs do contain meat, making them high protein and perfect for first responders.
The uses for MREs don’t stop at preparedness or military use. They’re amazing no-cook options for picnics and camping too. In fact, last Valentine’s day these made a perfect ‘romantic dinner’ hiked up to the best view for miles. Despite the February chill we had warm food (without breaking campfire bans) and sitting on the heaters afterwards gave us plenty of warmth to stay and chat as the sun set. Truly an unforgettable experience!
If you’re considering MREs for your kit, don’t wait to order! As the manufacturers reroute stock to deal with emergencies (most recently the California fires) they can be difficult to get, causing long wait times across the country. It pays to stock up before you need them and the five year shelf life* will ensure they’re still good when the time comes.
*Like most food storage this shelf life is dependent on cool storage temperatures.
Want to see MREs in action? Check out this video, and the product page for MREs.
Thank you for reading!
Written by Zenia Platten – Writer and emergency preparedness professional.
The Ins and Outs of Freeze Dried Food Part 3 – Other Food Storage Options
Throughout the last few weeks we’ve discussed a few of our favourite long term food storage options. We touched on the importance of calories and protein in your meal planning, and reviewed Legacy, Wise, and Augason Farms pre-made meals. Today, we’ll look at a few other food storage options that are perfect for short term preparedness, or bulking up your other food supplies.
SOS Calorie Food Bars
These are the classic go-to food option for 99% of pre-built emergency kits. They’re compact, durable, temperature resistant, and have a standard 5 year shelf life. They come in 3600 and 2400 calorie packs, which are 3 and 2 days of food respectively if rationing to the bare minimum.
Of all the available brands for calorie food bars, we like SOS best for the taste and the way they’re packed. Each package contains a number of individually wrapped 400 calorie bars, each of which acts as a meal. This keeps things clean and simple, especially when compared to the bars that need to be cut apart.
People usually assume that these bars taste bad, and some do, but we actually like the taste of SOS bars and eat them for office snacks when we have extra. They’re sweet and are most commonly compared to coconut short bread.
Backpacker’s Pantry
As the name implies, these awesome little pouches were originally designed for hikers, campers, and backpackers. The features that make it great for outdoor pursuits are also why we love it for preparedness, it’s lightweight, cooks right in the pouch, and tastes pretty darn good!
Not having to lug a cooking pot with you is the biggest advantage to Backpacker’s Pantry meals. The other freeze dried food brands we’ve discussed (here’s our previous post) all need to be added to boiling water and mixed in. With cook-in-pouch meals however, you can use a kettle to boil the water, add it to the pouch, and skip the dishes completely!
These meals have gluten free, vegan, and vegetarian options, are high protein, and come with two servings per pouch, making them ideal for individuals and couples. What’s the catch? The cook-in-pouch packaging has a shorter shelf life than its long-lived predecessors. Backpacker’s Pantry meals vary from a 3 to a 10 year shelf life, depending on the menu.
(PS: If you’re having trouble choosing – I highly recommend the Pad Thai! Yum!)
MEAT
That’s right folks, through the wonders of modern technology long shelf life meat is now a reality! You can keep tantalizing beef, melt-in-your-mouth chicken, and fragrant sausage with your freeze dried food stores for a whopping 25 years! The cans stack too, so you can easily store enough for all the meatatarians in your life.
Freeze dried meat does need rehydrating like any freeze dried food, but the beauty of it is that it can be rehydrated in your meal! Just toss a handful of beef into your Legacy or Wise Stroganoff for example and watch it reconstitute in the sauce. No extra water around? No problem! The meat is pre-cooked, so you can eat it straight from the can! (It will make you thirsty though – so it is ideal to have a drink on hand.)
Adding protein to your meals has never been so easy!
Fruits and Veggies
Freeze dried and dehydrated fruits and vegetables are crunchy little miracles! Keep them in the kitchen for out of season baking, in your kit for extra vitamins and minerals, or on your desk to enjoy while writing blog posts (or whatever it is you do.) While these items can be rehydrated, I prefer them as a snack straight from the bag. They’re crunchy, sweet (the fruits anyway) and good for you. What more could you ask for the mid-afternoon munchies?
On top of being delicious, there’s a reason our parents wanted us to eat our leafy greens. Vitamins and nutrients! Valuable micronutrients like iron, vitamin C, and Folate (a type of B vitamin) are great for reinforcing your immune system, keeping alert, and forming red blood cells. There are dozens of nutrients with a host of useful and important functions that our bodies need and crave. Adding some healthy greens to your food storage can be a perfect way of keeping healthy in an extended emergency.
Next Week
Thank you for reading and I hope you’ll join us next week for our last post in this Food Storage series. We’ll be taking an in-depth look at our most sought after food option: Meals Ready to Eat (MREs). Until then, have a great week!
Article written by Zenia Platten – Writer and emergency preparedness professional.
The Ins and Outs of Freeze Dried Food Part 2 – What’s the Difference?
Options abound when it comes to choosing a Freeze Dried Food (FDF) brand to trust. Total Prepare has done much of the legwork already, narrowing our selection carefully to a handful of brands we keep in our own kits. Today we’ll look at the most common question we receive at Total Prepare.
What’s the Difference Between These FDF Brands?
Great question! As covered last week, the biggest factors to look at when deciding on a FDF brand are calories and protein, but there are other elements that also come into play. Shelf life, allergies/sensitivities, cost, and taste are other aspects that we’ll also include in this article. Without further ado, let’s jump into our most popular brands!
Legacy Premium Food Storage
We are proud to be the sole Canadian distributor of Legacy Freeze Dried Food. It’s a great brand and a staff favourite to recommend to all our customers and to pack into our own kits too. Heck, we even take it camping!
Pros:
Legacy meal pouches have a shelf life of 25 years when unopened, making them perfect for set it and forget it preparedness. They have the lowest cost per pound in the industry (for pre-made meals) so they’re top notch for value, couple this with their stacking buckets for convenient storage and you have a great solution for families or businesses looking to prepare.
Big serving sizes are a priority for Legacy Food, and as a result they have the largest serving sizes around, often offering a third more food than the competition in the same number of servings. All of our Legacy options are vegetarian, with gluten free options available, non-GMO, and have no added MSG.
Trade offs:
In order to make their meals so lightweight and long-lasting, manufacturers freeze dry their food. In order for the end user (you and me) to undo the magic and make the meals okay to eat we need to rehydrate and cook them. This means that to prepare any freeze dried food (including those below) extra water and a heat source is required. On average, Legacy uses 6 cups of water per pouch (4 servings) and requires cooking for 15-20 minutes.
The second challenge for keeping FDF is storage temperature. In order to maintain that wonderful 25 year shelf life freeze dried foods (Legacy included) need to be kept at a cool, dry, consistent temperature. 11 Degrees Celsius is ideal.
Wise Food Storage
Pros:
W
ise Food also boasts a 25 year shelf life for long term storage, storing easily in stackable pails with ergonomic carrying handles. Smaller pouch sizes make Wise a great option for couples or individuals who might not finish a larger pouch, taking leftover management out of the equation.
Wise Food takes less water to cook than other brands (1 cup per serving) and can be removed from heat once it is brought to a boil, preserving potentially precious fuel. While the taste is similar to Legacy options, Wise generally pulls ahead in blind taste tests.
Trade Offs:
As with all Freeze Dried Food, Wise encounters the same temperature requirements for storage. Cool, dry places are best. It also still requires a stove and extra water to cook (though less than it’s counterparts). The smaller serving sizes make it extra important to watch your calorie counts. Three meals a day might not cut it.
Augason Farms
Pros:
Augason Farms is easily the most economical option for freeze dried meals. Every package is tailored to maximize raw calories and fill bellies quickly and efficiently. The clear labeling is excellent for ensuring that you’re getting enough food energy each day, detailing how many calories to expect and for how many days. Many of their meal packages even come with a meal plan to keep you on track.
Bulk fruits and vegetables is where Augason Farms really shines. Packaged with longer shelf lives in attractive, clearly labelled pails or #10 cans they’re perfect for filling out your emergency food storage with important vitamins and minerals. Not to mention they’re tasty!
Trade Offs:
Where Legacy and Wise Foods both offer a large variety of meals (13+ menu optio
ns) Augason Farms keeps things simple, offering 6 meals and a handful of snacks and sides. For short term emergencies this is great, but if you’re hunkering down for a week or more the lack of variety isn’t ideal.
As one might expect with an economy option, Augason Farms is less flavourful than its counterparts. While it does a great job of keeping survivors full, it definitely tastes like emergency food.
As above, Augason Farms requires additional water and a heat source to cook, and it’s shelf life is shorter than Legacy or Wise, coming in at 10-20 years, depending on the meal.
Summary
Whether you’re feeding Legacy to a family or persons with sensitivities, storing Wise for a couple or individual, or cashing in on the economical Augason Farms packages, all of these brands are a great addition to any emergency food store. Why not try them all?
If you have any questions about freeze dried food, or would like to suggest a topic for a future post, please feel free to leave a comment, email, or give us a call! Thank you for reading and join us next week as we look into alternative food storage options like SOS calorie bars, Backpacker’s Pantry, and bulk fruits, veggies, and meat.
This article was written by Zenia Platten – Writer and emergency preparedness professional.


